Remember: if you need any help getting setup please do contact us; we're always happy to help. Sometimes it's easier to talk something through with our friendly experts.
In this Quick Start Guide we will go through the entire process of testing candidates. We will walk through:
Step 1: Creating a project
Step 2: Inviting candidates to the project
Step 3: Viewing results
Step 4: Buying credits
Step 5 (optional): Review your account settings
Step 1: Create a new project
1 (a) Click Projects > Add in the left-hand menu bar
1 (b) Define your project by completing the following fields:
Project Name is anything you like, for example "Tests for Area Manager". Bear in mind that candidates will see the names of your projects.
Description (optional) This is useful to describe what the project is, for example you could put "One numerical test and one verbal test for the position of Manager." This description will be visible to candidates. You can enter something or leave this blank.
Email Reports To Me (optional) Tick the box and use this if you want candidates' results to be automatically emailed to someone when each candidate completes the project. Separate multiple email addresses with a comma like this:
hr1@company.com, hr2@company.com
Candidate Can See Their Reports (optional) If you tick this box candidates will be able to see a summary version of their results report.
The 'Pause Project' box should only be ticked if you want the project to be inactive or on hold. Most people leave this box unticked. Only tick this box to deactivate your project.
Advanced Anti-Cheat Detection (optional) This will enable advanced cheat detection features like detecting when the mouse moves outside the screen and if the time taken is abnormally fast.
Next, choose the assessments that candidates will to take.
Once you've selected the Type of test you can then select the specific Test within that category. Finally chose the Norm group you would like to compare your candidates' results against. Norm groups are just who your candidates' scores are compared against. In practice choosing different norm groups only makes a few percentile points difference, but try to pick the most accurate group for your candidates. You can read more about norm groups here. And further details on each test can be found here.
We're always here to help you choose the best assessments. Feel free to contact us; and we can discuss your specific situation.
1 (c) At the bottom of the page click Save and your project is ready to go!
Now that you have a project, you can move onto step 2 and invite candidates.
Step 2: Invite candidates
Now you have a project defined, you can invite candidates to it. There are four different ways to add candidates to your project:
- Manually type their details (most common for small projects);
- Send a public invite link using an project Access Key; or
- Upload a bulk CSV file
- Integrate with an ATS. Speak to us if you'd like to use an ATS.
In this Quick Start Guide we will follow the first method, as this is what most clients prefer to do. If you have large volumes of candidates you may prefer to follow one of the other methods (use a project Access Key or bulk CSV upload).
2 (a) Click Candidates > Add in the left-hand menu bar
2(b) Complete the following fields:
Project, First Name, Last Name, Email.
The Email field is where we will send the candidate's login details (username and password) so you can put your own email address if you want to receive the login details, or put the candidate's email address if you want our system to send an email direct to the candidate.
Click 'Send Now' and our system will automatically send an email to the email address you have entered as the candidate's email address. You will see a preview of the message before it is sent, which you can edit if you like. To edit the email template go to Projects > List > Email Templates.
The candidate will now receive an email which looks a bit like this: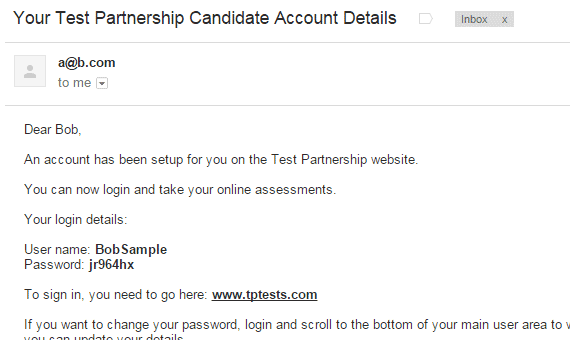
That's it! Your candidate has now been added to your project and they can start their test by clicking the link in the email they have just received. Now you just wait for the candidate to finish their test. As soon as they finish, their results will automatically appear in the 'Results' section of your account.
Tip: when you invite your first candidate, a preview of the email will appear so you can check it there. You can also edit the email by going to Projects Edit.
Note: credits are required to start a test. If you run out of credits candidates will still be able to complete their assessments but the system will not let you see any of the results until your credit balance is above zero. You can top-up your credits at any time.
Step 3: Download candidates' results
As soon as a candidate has completed any of your projects you can view their results and download PDF reports. If when setting up the project you chose to have reports emailed to you these will arrive in your inbox automatically. If you want to see and download the reports on the system here is how:
3 (a) Click Results > View All in the left-hand menu bar.
If your credit balance is above 0 you will see a list of all the complete and incomplete assessments you are running. If there is nothing in this list then none of your candidates have been added to any of your projects yet.
3 (b) Click the download icon next to the report you want to download.
The most important part of the report is the candidate's percentile score within the norm group. If you need any help interpreting the report have a look at this support article or ask us.
You can also export all your candidates' results to a CSV file by going to Results > List > Export. This is a good way to perform bulk calculations and decisions using Excel.
Step 4: Buying credits
Credits are deducted when a candidate starts a test. You can top-up your credits or buy an annual plan any time by clicking Buy Credits.
If your balance falls below zero credits, your Results page will deactivate and Projects which have been set to automatically email you the reports will stop sending you the reports. So it's a good idea to keep your credit balance positive.
Don't worry if your credit balance does fall below zero; your tests will still remain open and this won't affect your candidates in any way. Candidate will still be able to take their tests. All that happens is you won't be able to see their results until you return your credit balance above zero.
To buy more credits, click the the Account button at the top-right then Buy Credits.
Your credit balance is updated instantly and we will email you with a full VAT receipt.
Step 5 (optional): Review your account settings
There are a couple of settings you should review, most importantly Data Retention settings. By default all candidate date is anonymised after 24 months. If you'd like to change this period go to Account > My Account
Then click Edit Client Details
Scroll down to Data Retention Period > type number of months > Save
Don't forget to save!
You can also upload your logo if you like. This will appear on the assessment pages for your candidates and the PDF reports. Still in the Edit Client Details section, click Upload Logo.
And click Save
That's the basics covered
Here we have covered the most common settings. But our assessment platform has lots of other powerful features. Feel free to browse the other knowledge base articles or get in touch; with one of our friendly experts.
Comments
0 comments
Article is closed for comments.